
Securing Your ClawdBot: Stop Showing Up on Shodan
The fix is already built in. Here's how to turn it on or use a different approach
Hello! I am Jeff, a seasoned software engineer who has worked on everything from R&D with reverse engineering, creating honeypots to catch malicious users, and even troubleshooting server hardware. I love solving problems and building things in a scalable, secure, and redundancy-based fashion. This will be a place where I show my thoughts on tech and share my knowledge.
The Problem
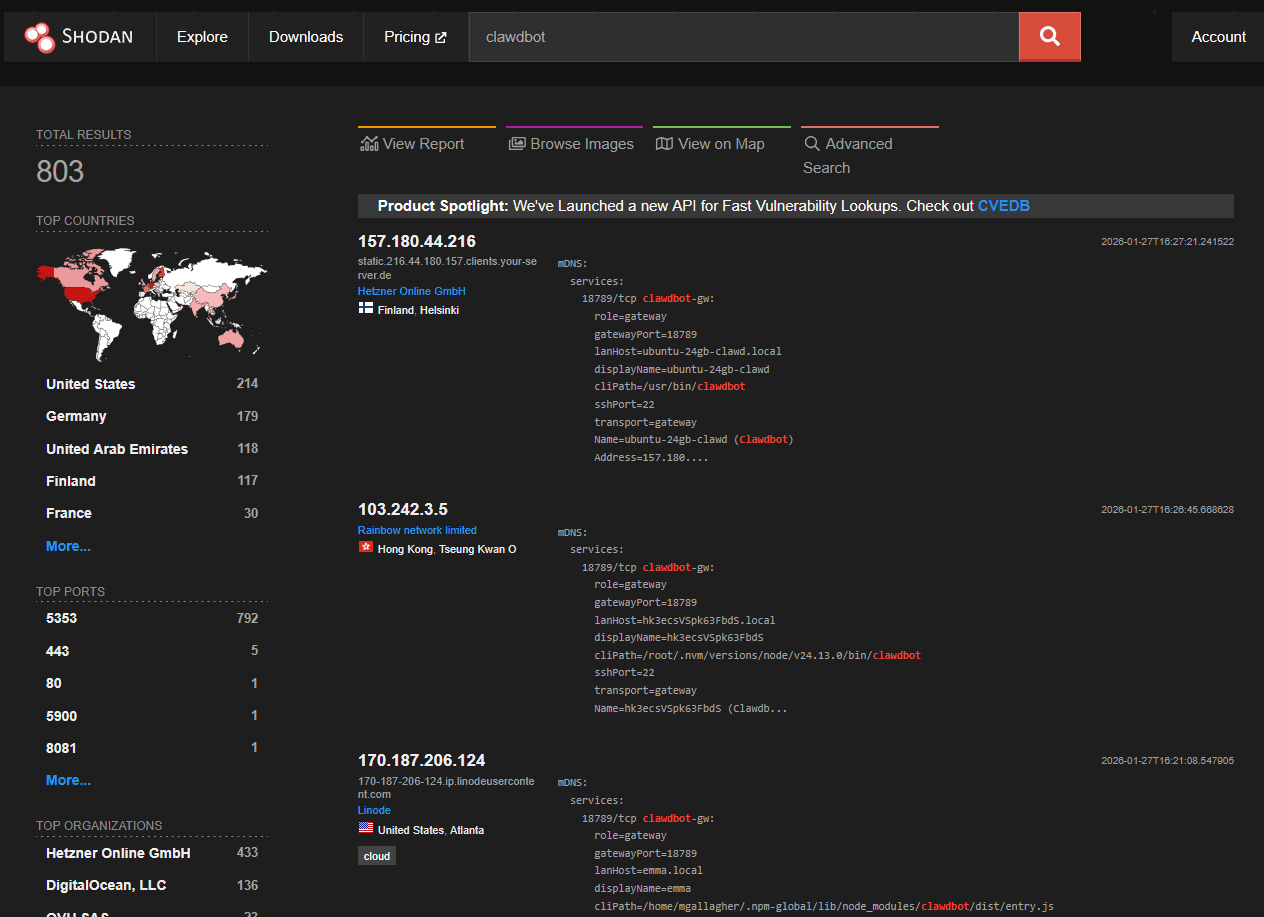
Moltbot (formerly Clawdbot) exploded in popularity. Thousands of instances spun up in days. Most people followed quick-start tutorials that skip security entirely.
The result? Shodan searches for "Clawdbot Control" return exposed dashboards with:
- Shell command execution
- Browser automation (CDP)
- API keys, OAuth tokens, bot credentials
- Full conversation histories
- Ability to impersonate users across WhatsApp, Telegram, Discord, Slack
This isn't theoretical. Security researcher Matvey Kukuy demonstrated a prompt injection attack: send a malicious email to an exposed instance, the AI reads it, believes it's legitimate instructions, forwards victim's emails to attacker. Five minutes start to finish.
Quick Self-Check
Before reading further, find out if you're exposed:
# Replace with your public IP
nmap -p 18789,18791
Results:
filteredorclosed→ You're probably fine, but keep reading to verifyopen→ You have a problem. Keep reading.
If you're on a home network and didn't port forward, you're likely okay. But if you used ngrok, Cloudflare Tunnel, or similar to get "remote access" — that counts as exposed.
Choose Your Path
Where is your Moltbot running, and what matters to you?
| Deployment | Want it fast? | Want full control? |
| 🏠 Home (Mac Mini, Pi, NAS) | Tailscale (~10 min) | WireGuard (~30 min) |
| ☁️ Cloud (AWS, Hetzner) | Tailscale (~10 min) | WireGuard (~30 min) |
The tradeoff is the same regardless of deployment:
| Aspect | Tailscale | WireGuard |
| Setup time | ~10 minutes | ~30 minutes |
| External dependency | Tailscale coordination servers | None |
| NAT traversal | Automatic | Manual (port forward or public IP) |
| Per-device config | Automatic via tailnet | Manual key exchange |
| Cost | Free (personal) | Free |
Neither is wrong. Pick based on whether you value convenience or independence.
🏠 Home + Tailscale (Fast Setup)
Time: ~10 minutes
Complexity: Low
External dependency: Tailscale coordination servers
This is the path of least resistance. Moltbot has Tailscale support built-in. You're not adding something new — you're turning on something that's already there.
What You're Getting
+-------------------------------------+
|  Home Network                       |
|  +-------------------------------+  |
|  |  Mac Mini                     |  |
|  |  +- Tailscale daemon          |  |
|  |  +- Moltbot (localhost:18789) |  |
|  +-------------------------------+  |
|                                     |
|  Router: No port forwarding         |
|  Firewall: Default (nothing open)   |
+-------------------------------------+
              ^
              |
       Tailscale mesh (encrypted)
              |
              v
       Your phone/laptop (anywhere)
- Gateway binds to localhost only
- Tailscale Serve provides HTTPS + handles routing
- No router configuration needed
- No dynamic DNS
- Access from anywhere on your tailnet
What You're Trusting
Tailscale's coordination servers handle connection brokering. They see:
- Device metadata (IPs, hostnames)
- When devices connect
They don't see:
- Your traffic (end-to-end encrypted via WireGuard under the hood)
- What you're doing on Moltbot
If this tradeoff bothers you, jump to Home + WireGuard.
Setup
1. Install Tailscale on your Mac Mini:
# macOS
brew install tailscale
# Or download from https://tailscale.com/download/mac

# Linux
curl -fsSL https://tailscale.com/install.sh | sh

# Start and authenticate
sudo tailscale up
2. Install Tailscale on your phone/laptop(s):
Same account. They'll automatically join your tailnet.
3. Configure Moltbot:
Edit your config (~/.moltbot/config.json or via moltbot configure):
{
  "gateway": {
    "bind": "loopback",
    "port": 18789,
    "tailscale": {
      "mode": "serve"
    },
    "auth": {
      "mode": "token",
      "allowTailscale": true
    }
  }
}
4. Restart Moltbot:
moltbot gateway restart
# or if running as service
sudo systemctl restart moltbot
5. Access from anywhere:
Your Moltbot is now available at https://<hostname>.<tailnet>.ts.net
from any device on your tailnet.
Verify It's Working
# On your Mac Mini - should show tailscale serve active
tailscale status

# From your phone/laptop - should connect
curl https://..ts.net:18789/health

# From outside your tailnet - should fail
curl http://:18789/health  # timeout or refused
🏠 Home + WireGuard (Full Control)
Time: ~30 minutes
Complexity: Medium
External dependency: None
You want full control. No external services. You own every piece.
What You're Getting
+-------------------------------------+
|  Home Network                       |
|  +-------------------------------+  |
|  |  Mac Mini                     |  |
|  |  +- WireGuard server          |  |
|  |  +- Moltbot (localhost:18789) |  |
|  +-------------------------------+  |
|                                     |
|  Router: Forward 51820/udp only     |
+-------------------------------------+
              ^
              |
       Single UDP port (encrypted)
              |
              v
       Your devices (with WG config)
- One port forwarded through your router
- Connect via VPN → access localhost services
- Zero external dependencies
What You're Responsible For
- Port forwarding on your router
- Dynamic DNS if your home IP changes (or get a static IP)
- Key generation and distribution per device
- Updating configs when you add devices
Setup
1. Install WireGuard on your Mac Mini:
# macOS
brew install wireguard-tools

# Linux
sudo apt install wireguard
2. Generate server keys:
# macOS
cd /usr/local/etc/wireguard

# Linux
cd /etc/wireguard

umask 077
wg genkey | tee server_private.key | wg pubkey > server_public.key
3. Create server config:
macOS: /usr/local/etc/wireguard/wg0.conf
Linux: /etc/wireguard/wg0.conf
[Interface]
PrivateKey =
Address = 10.200.200.1/24
ListenPort = 51820

# Your phone
[Peer]
PublicKey =
AllowedIPs = 10.200.200.2/32

# Your laptop
[Peer]
PublicKey =
AllowedIPs = 10.200.200.3/32
4. Generate client keys (repeat per device):
wg genkey | tee phone_private.key | wg pubkey > phone_public.key
5. Client config (e.g., phone):
[Interface]
PrivateKey =
Address = 10.200.200.2/24
DNS = 1.1.1.1  # or your preference

[Peer]
PublicKey =
Endpoint = :51820
AllowedIPs = 10.200.200.0/24
PersistentKeepalive = 25
Note: This config uses split tunneling — only traffic destined for your Moltbot network (10.200.200.0/24) goes through the VPN. Your normal internet browsing stays on your local connection, so speeds aren't affected.
If you wanted all traffic routed through your home server (full tunnel), you'd use
AllowedIPs = 0.0.0.0/0instead. But for just accessing Moltbot, split tunnel is what you want.
Import this config into the WireGuard app on your phone/laptop.
6. Router config:
Forward UDP port 51820 to your Mac Mini's local IP. Every router is different, but look for "Port Forwarding" or "NAT" settings.
7. Dynamic DNS (if needed):
If your ISP gives you a dynamic IP, set up DDNS:
8. Start WireGuard:
# Start
sudo wg-quick up wg0

# Auto-start on boot (macOS)
sudo brew services start wireguard-tools

# Auto-start on boot (Linux)
sudo systemctl enable wg-quick@wg0
sudo systemctl start wg-quick@wg0
9. Configure Moltbot:
{
  "gateway": {
    "bind": "loopback",
    "port": 18789,
    "auth": {
      "mode": "token",
      "token": ""
    }
  }
}
Verify It's Working
# On a client device, connect to WireGuard first, then:
curl http://10.200.200.1:18789/health

# From public internet (should fail)
curl http://:18789  # timeout

# Only 51820 should be reachable from outside
nmap -sU -p 51820   # should show open
nmap -p 18789        # should show filtered
☁️ Cloud VPS + WireGuard (Recommended for Cloud)
Time: ~30 minutes
Complexity: Medium
External dependency: None (just your VPS)
You're running Moltbot on AWS Free Tier, Hetzner, or similar. By default, everything is exposed. Lock it down to a single port.
What You're Getting
+--------------------------------------+
|  AWS Free Tier Instance              |
|  +--------------------------------+  |
|  |  WireGuard server (51820/udp)  |  |
|  |             |                  |  |
|  |             v                  |  |
|  |  Moltbot (127.0.0.1:18789)     |  |
|  +--------------------------------+  |
|                                      |
|  Security Group:                     |
|  - ALLOW 51820/udp from 0.0.0.0/0    |
|  - DENY everything else inbound      |
+--------------------------------------+
              ^
              |
       Your devices (WireGuard clients)
Setup
1. Security Group (AWS Console or CLI):
Start with only SSH for initial setup:
# After WireGuard is working, your security group should only have:
aws ec2 authorize-security-group-ingress \
  --group-id  \
  --protocol udp \
  --port 51820 \
  --cidr 0.0.0.0/0
2. Install WireGuard on the instance:
sudo apt update && sudo apt install -y wireguard
3. Generate keys:
cd /etc/wireguard
umask 077
wg genkey | tee server_private.key | wg pubkey > server_public.key
4. Server config (/etc/wireguard/wg0.conf):
[Interface]
PrivateKey =
Address = 10.0.0.1/24
ListenPort = 51820

[Peer]
PublicKey =
AllowedIPs = 10.0.0.2/32
5. Enable and start:
sudo systemctl enable wg-quick@wg0
sudo systemctl start wg-quick@wg0
6. Firewall (belt and suspenders with security group):
sudo ufw default deny incoming
sudo ufw default allow outgoing
sudo ufw allow 51820/udp
sudo ufw enable
7. Configure Moltbot:
{
  "gateway": {
    "bind": "loopback",
    "port": 18789,
    "auth": {
      "mode": "token",
      "token": ""
    }
  }
}
8. Client config (your laptop/phone):
[Interface]
PrivateKey =
Address = 10.0.0.2/24

[Peer]
PublicKey =
Endpoint = :51820
AllowedIPs = 10.0.0.0/24
PersistentKeepalive = 25
Note: This config uses split tunneling — only traffic destined for your Moltbot network (10.0.0.0/24) goes through the VPN. Your normal internet browsing stays on your local connection, so speeds aren't affected.
If you wanted all traffic routed through your AWS instance (full tunnel), you'd use
AllowedIPs = 0.0.0.0/0instead. But for just accessing Moltbot, split tunnel is what you want.
9. Remove SSH from security group:
Once WireGuard is working, you can SSH over the tunnel:
ssh user@10.0.0.1
Then remove port 22 from your security group entirely.
Verify
# Connect via WireGuard, then:
curl http://10.0.0.1:18789/health

# From public internet:
nmap -p 18789,18791,22   # all should show filtered/closed
nmap -sU -p 51820        # should show open
☁️ Cloud VPS + Tailscale (Fast Setup)
Time: ~10 minutes
Complexity: Low
External dependency: Tailscale coordination servers
Same as the home Tailscale setup, but on your VPS. The advantage: zero ports open to the public internet.
What You're Getting
+--------------------------------------+
|  AWS Free Tier Instance              |
|  +--------------------------------+  |
|  |  Tailscale daemon              |  |
|  |             |                  |  |
|  |             v                  |  |
|  |  Moltbot (127.0.0.1:18789)     |  |
|  +--------------------------------+  |
|                                      |
|  Security Group: DENY ALL inbound    |
+--------------------------------------+
              ^
              |
         Tailscale mesh
              |
              v
         Your devices
Setup
1. Initial access:
You'll need SSH temporarily for setup. Keep port 22 open in your security group until Tailscale is working.
2. Install Tailscale:
curl -fsSL https://tailscale.com/install.sh | sh
sudo tailscale up
Follow the auth link to add the instance to your tailnet.
3. Configure Moltbot:
{
  "gateway": {
    "bind": "loopback",
    "port": 18789,
    "tailscale": {
      "mode": "serve"
    },
    "auth": {
      "mode": "token",
      "allowTailscale": true
    }
  }
}
4. Enable Tailscale SSH (optional but recommended):
sudo tailscale up --ssh
Now you can SSH via Tailscale:
ssh user@..ts.net
5. Lock down security group:
Remove ALL inbound rules. Yes, including SSH. You access everything through Tailscale now.
Verify
# From your tailnet:
curl https://..ts.net:18789/health

# From public internet (should all fail):
nmap -p 18789,18791,22   # all filtered/closed
Universal Checklist
Regardless of which path you took, verify these:
- [ ] Moltbot binds to loopback (127.0.0.1), NOT 0.0.0.0 or LAN
- [ ] No ports forwarded directly to Moltbot (18789, 18791)
- [ ] No ngrok/Cloudflare tunnels pointing to Moltbot
- [ ] Gateway auth token is set and strong
- [ ] Can access Moltbot through your tunnel (Tailscale or WireGuard)
- [ ] Cannot access Moltbot from public internet
Quick verification commands:
# From OUTSIDE your tunnel - these should all fail/timeout:
curl http://:18789/health
curl http://:18791/health

# Shodan check (replace with your IP range):
# Search: port:18789 net:
# Should return nothing
What NOT To Do
❌ gateway.bind: "lan" or "0.0.0.0" with ports exposed
This is how you end up on Shodan.
// DON'T DO THIS
{
  "gateway": {
    "bind": "lan"
  }
}
❌ Port forwarding 18789 through your router
You've just exposed shell access to the internet.
❌ ngrok / Cloudflare Tunnel to the gateway
These give you a public URL. That's the opposite of what you want.
# DON'T DO THIS
ngrok http 18789
❌ Tailscale Funnel without password auth
Funnel makes your service public. If you must use Funnel (you probably don't),
enforce gateway.auth.mode: "password". Moltbot refuses to start Funnel
without this, for good reason.
// If you MUST use Funnel (think twice)
{
  "gateway": {
    "tailscale": {
      "mode": "funnel"
    },
    "auth": {
      "mode": "password",
      "password": ""
    }
  }
}
❌ "I'll add auth later"
You won't. Do it now.
Summary
| Path | Time | External Dependency | Best For |
| Home + Tailscale | ~10 min | Tailscale servers | Fast setup, no router config |
| Home + WireGuard | ~30 min | None | Full control, own your stack |
| Cloud + WireGuard | ~30 min | None | Single open port, you own everything |
| Cloud + Tailscale | ~10 min | Tailscale servers | Zero open ports, fast setup |
The choice isn't about skill level. It's about what you value:
- Convenience → Tailscale
- Independence → WireGuard
Both are free. Both work. Pick one and actually do it.
Further Reading
Don't be the next Shodan screenshot.